Retropie Game Emulator
I am working on a game emulator using Retropie with custom controllers.
| Engineer | School | Area of Interest | Grade |
|---|---|---|---|
| Yishai O | Frisch | Engineering | Incoming Freshman |

Reflections
BlueStamp has given me so much, and I have definitely learned a lot in my time at BlueStamp. I now know how to set up and code a retropie and hook it up to a monitor. I can code and wire an Arduino Pro Micro, I can solder, and I know the correct way to wire buttons and joysticks. Even more important than all of those, though, is that I can troubleshoot, and I kniw not to give up when my project is full of problems. But BlueStamp gave me a lot more than just knowledge. They supplied me with enough materials that I can continue to build different projects, and the instructors helped me realize how much I really love both the hardware and software parts of engineering. I think that because of this experience, I will pursue more mechanical and computer engineering based projects.
Final Milestone
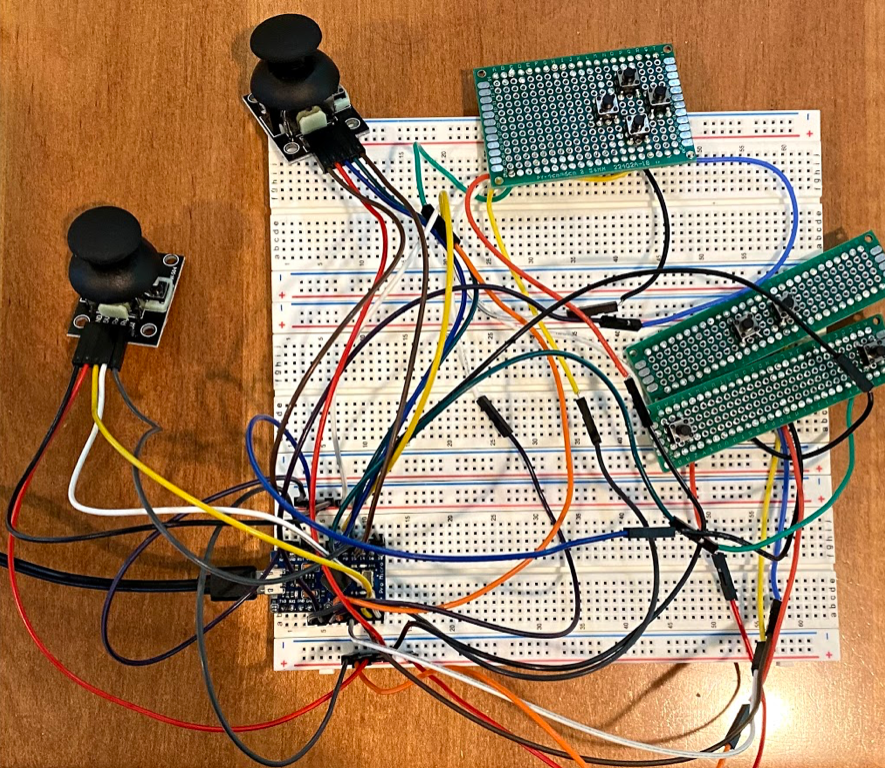
My third and final milestone is creating my own custom controller. I had to learn how to code and use an arduino, as I had never done either of those things before. I also had to learn how to solder, because all of the buttons on my controller required me to solder them onto a proto board, which I had also never done before. I had never wired anything either, so I had a lot of researching and learning that I had to do before I could even start. What I hadn’t realized was that I needed a specific type of Arduino for my controller, so I accidentally ordered the wrong one. It took a while to order a new one and wait for it to arrive, so I couldn’t wire everything together for a few days. In the end though, it wasn’t a big loss, as I used the time to code and finish everything, and I ended up with a fully functioning controller! I was originally going to make it wireless, but I ran out of time, so I will attempt it on my own. Below I included a picture of the controller and a snippet of the code, along with a circuit diagram (excluding a few buttons).


Second Milestone
My second milestone is adding a game to my Retropie. First, not knowing I had a USB to use, I tried to connect through a downloadable app on the computer, but that didn’t work. Later, realizing there was a USB I could use, I created a file on the USB titled “retropie”. Then, I plugged it into the Retropie for 30 seconds, and then removed it and plugged the USB back into the computer. Then, I moved the previously downloaded games into the files with the same name as their original console, generated by the Retropie, and ejected the USB. Finally, I put it back into the Retropie, waited until all of it had downloaded, took out the USB, and restarted the Retropie. When it reloaded, the games were inside and playable.
First Milestone
My first milestone is setting up the Retropie and hooking everything up to it, like the keyboard, mouse, and pre-made controllers, along with getting the wifi and the internet working. Unlike the usual, I downloaded Retropie instead of Raspberry Pi, since Retropie is better for games. I had to download an imager so I could get the Retropie onto my Raspberry Pi’s SD card, and that took a while, because it didn’t work on the computer I normally used. I had to use a seperate computer, which was a VERY slow process. After downloading Retropie onto my SD card, which I inserted into the computer, I stuck it into my Raspberry Pi, hooked up the monitor, keyboard and mouse, and controllers, and booted it up. After that, I connected the Retropie to Wifi and the internet, and it was working.